
Modified Basic Bind Off for Loom Knit Edges

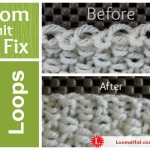
The basic bind-off just wasn’t working for me. I kept getting one end that was wider and the other tighter regardless of the type of loom or yarn. It looked odd and I needed to find a better solution to a technique that was pretty good and seemed to work for other people but not me. I had seen someone add a crochet single stitch and I tried that. It was alright but left a tiny hole. I was frustrated. I played around and changed just one thing. The modified basic bind off did the trick.
I just added an extra step every 2-3 stitches depending on the tension and done. Once I tighten my loose ends from my cast-on I ended up with clean edges, squared points and identical widths on both ends I was one happy Loomy.
Below are Text , Pictures and a Video tutorial.
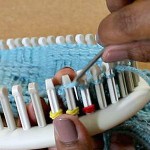
First, The Instructions for the Basic Bind-Off
Follow the picture and text instructions below for the Traditional Basic Bind-0ff. If like me, you’re a visual learner, use the video tutorial at the end of this post. In less than 5 minutes you will master this really cool cast-off method.
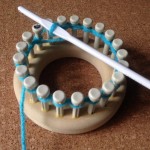
Cast-on: I used the e-Wrap cast-on and Tighted my Loose Loops
Loom: Used in the Pictures and the Video is the KB Adjustable Hat Loom
Stitch: The Stitch Pattern in the Pictures and Video is the Double Basket Stitch
This technique is worked over 2 pegs.

Step 1: Wrap Peg 2
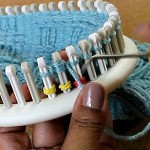
Step 2: Knit-off
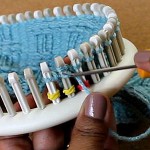
Step 3: Take Loop from Peg 2

Step 4: Place it on Peg 1
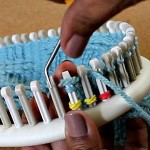
Step 5: Knit off
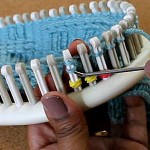
Step 6 : Move Loop from Peg 1 on Peg 2
Repeat the process.
The Modified Version
 Before reading my change in this section make sure you have mastered the steps above in the Basic Bind-off first.
To create the change in the original technique I’ve really only changed one thing and that is done after every second or third stitch id bind-off.
I wrap both pegs 1 and 2 (instead of only peg 2) then continue with the same steps as above.
When I bind off the next 2 – 3 stitches I modify the first step again by wrapping both pegs 1 and 2 until I have only 3 wrapped pegs left to bind-off.
I then do a modify basic bind off and when I only have 2 stitches left I DON’T wrap the last peg but instead move it to the peg next to it, knit off and then feed the working yarn through that last peg.
Done.
For a better visual see the video below.
Video: Modified Basic Bind Off
.
Please watch the whole video before attempting the technique. This will make the process a lot simpler and you will feel more assured that you can handle this cast-off method.
To Subscribe to my YouTube Channel: Click HERE
To Become my Patron for Just $1 and Receive a Really Cool Freebie: Click HERE


I need a pattern for the cowl loom hats for Mongolia
Here is another: Click HERE
I’m confused about the start of the modified bind off for knitting in the round. In your video you only show it for flat panel knitting. I just finished the rib stitch fingerless glove (the last stitch being a purl stitch) and now I’m trying to figure out how to bind it off but I’m stuck. Help!
Lauren, I my next video I’m using the bind-off on a cowl and that will show you how.
I love the videos that you make. I’ve learned so much from you. For the modified basic bind off, is this used only on blankets and afghans?
Nope ! You can use it for any project – what did you have in mind?
I was thinking about using it for my 10 stitch blanket and scarves. What other projects can use this bind off?
Wow – the possibilities are endless …dishcloths – sweaters – boot cuffs – hats … anything
What is the advantage of using the modified bind-off, as apposed to the regular one? I am doing your fingerless glove patter, and was wondering if it matters what bind-off I use, this one is a bit tricky. 🙂 Thank You!
I find that the regular one tends to tighten up the fabric way to much. If it makes it easier just modify at and the beginning and at the end. The only thing you’re doing differently is you knit both stitches instead of just the second stitch.
Hope that helps
Wow! I’m learning to loom and I love it. But, to have you there, showing everything so clearly and patiently made the difference!!!! Your knowledge and caring has helped many to continue the work you so generously shared. Thank you for all you do for all of us!!! Con
Thank you Connie for your kind words. i LOVE to read them ! ! ! They are GREATLY appreciated.
BIG Hugs,
Thanks Denise! I too had issues with bind offs! Can’t wait to try this! Such a simple modification, yet a lovely finish! I am going to be trying the beautiful double basket weave on a scarf for a Christmas gift! Thank you again, I always learn something from you! ?