 Add Yarn or Change Color
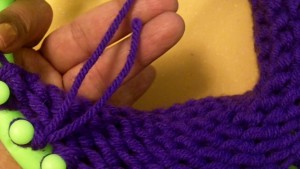
Add yarn or change colors in the middle of a loom knit project with no problems. Here are two quick and easy tutorials to show you how I do it. One is text, the other a 2 minute video. The purpose was to answer the question, “What do I do if I run out of yarn“. This technique also works for changing colors.
Step One
Make a loop (slip knot) with the yarn you want to add
Step Two
Put the loop on the very next peg
Step Three
(Optional) Tie the two short ends. I always do this because it makes me feel more secure that the work won’t unravel.
It’s that easy. Not much fanfare. Just three simple steps and you’re back in business. Hope this helps. If you add yarn in a different way please share it with us in the comment section. Ideas of any kind are always good ideas.
Add Yarn: The Video
===========================================================================
Related Posts
Tagged: change color, changing color, connecting yarn


Thank you for your clear tutorials, I’m a beginner and have found your videos helpful. Curious, I read the comment about running out of yarn and starting on the NEXT peg but a viewer said it caused holes. Could you start it on the LAST peg that you were working on in order to avoid the holes?
Could be that – that person did not tie the 2 strings (the string the was cut with the string the was added) tight enough.
Starting New Yarn On Next Peg Creates Holes! Not a ravelling hole- just a wide hole as if you are making a buttonhole, but not on purpose 🙂
To avoid this- TWIST the new yarn in. I know it sounds mysterious, as I often ask myself “how is it that a hole is created when I am merely changing the color and doing exactly the same stitch and motions on the loom as if I never brought in another piece of yarn?” Yeah I don’t exactly get the physics of it either, but fair warning: No Twisting, You Get a Hole.
The video links will not work on my computer. There is no play button just a blank black square
The videos on the page are working. It is definitely your computer. Have you ever been able to play a video on your computer? – You may need to install Flashplayer. It could be your browser. There are a few reasons why your computer won’t play videos. I can’t really help with that – not a computer expert. You could try going directly to YouTube – Click HERE
I have a question on this. When I loom knit with two colors, like for example, k2 (green), k5 (white), how can you make the wrong side of the hat look clean and neat and not full of loose yarn? Mine looks like this: http://www.flickr.com/photos/chuntaili/10147742345/
Appreciate your website! I always check it for useful tips. 🙂
Hey Leiza, so sooooooory about the delay in response.. It’s been crazy. I’m trying to build another loom knitting site for Spanish speakers. I don’t think in Spanish so everything takes longer. About the loose fibers inside the hat. I tie them in blocks. Then sew the blocks to the hat. Just to tidy the strings. Not a 100 % perfect solution. A bit hard to explain. The hat is very popular – so will try to do a video before the December holidays. Should explain the hat and the flat drawstring issue.
Thanks so much for visiting and participating – you make blogging fun. It confirms that someone is out there and likes my work.
I appreciate you greatly.
denise
Quite alright. As long as you gave me an answer at all, I’m totally grateful. 🙂 I’m not sure how you mean about tying in blocks. Would love a visual example, most definitely. 😉