
The Andalusian Stitch on a Knitting Loom
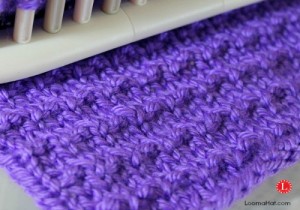
This simple but very cutesy stitch is another combination of the all time favorite knitting couple, the Knit and Purl. The Andalusian Stitch is easy enough for beginners yet detailed enough with its subtle bumps to give a nice textured look to any of your favorite projects.
This knit and purl do give it a somewhat elastic tension so the fabric does condense but it’s not elastic enough to replace the Rib Stitch on your brims. But is makes for a great dishcloth or washcloth. I intend to make mine a 8×8 square to send to Knit a Square.
Let me know how you used yours and now the pattern and video tutorial to help you make you own Andalusian Stitch …
I like that anyone can do this pattern and that it lends its self for any kind of project from the basic hat to gloves, socks or just the ornate pocket on a shirt or sweater. It does make for a dense stitch however the striped part does leave a slim line of opening when you switch the pattern from rows of knit to the rib stitch.
 Skill Level: Easy
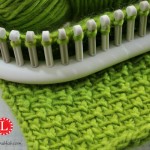
Loom: Any but the stitch works best with a small gauge loom. Just doesn’t show up well with large gauge looms like the Knifty Knitter or the Boye. I used the Adjustable Hat Loom .
Yarn: Like most textured stitch patterns this one looks best in a solid color with a slight sheen. I used one of my favorite brands Caron Simply Soft in Grape. Other economy brands like the Red Heart just didn’t work well.
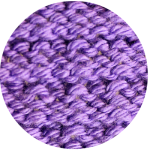
The Reverse Side: Dense and Uniformed. Slightly Striped
Recommendations: This baby rolls and curls. If doing a flat panel give it borders. Pull on the fabric a bit to stretch out the knit stitches. Tighten the loose loops and block your knitted items.
The Pattern
Multiples of 2 + 1 add the extra stitch for edges
Row 1: Knit
Row 2: Knit
Row 3: Knit
Row 4: Knit 1, Purl 1
Repeat until you reach the desired length.
Scroll down for the video tutorial
.
The Video: Andalusian Stitch
As I always recommend, you should watch the video from beginning to end before trying the stitch pattern. Should you have any questions please feel free to write them in the comment section below.
I hope you enjoy this video. If you do Subscribe so that you don’t miss any of the upcoming stitches in this Sunday Stitch Series.
To Subscribe to the YouTube Channel: Click HERE
To Share this Video: Send this link: https://www.youtube.com/watch?v=n17suI8SGxQ
====================================================================

Tagged: andalusian, knit and purl, rib stitch, stitch, stitch pattern, stitches


Hi Denise,
I’m having so much fun with your stitch patterns. You have some lovely ones, including this one. I was curious, though, why this pattern says to use the true knit rather than you usual U-knit. I’ve agreed that the outcome of both looks pretty much the same, but I’m sure you have a reason. Thanks, in advance.
Can’t wait for more stitches! 🙂
Hey Pat, I actually tend to like the U way more the any other. Personally when I tried the U I found the the bump was more noticeable with the true. Might just be my tension versus yours. But, you are right almost always the U work just as well as – sometimes better then the classic.
I just love your videos. They are so clear and concise. I’m going to do the Andalusian stitch on a hat that in going to start tonight. I love learning new stitches. Thank you so very much.
I’m trying to get started will row one be the cast on I’m new at this and it’s kinda hard when people start in the middle thanks so much
Hi David, the purpose of the post was just to teach the stitch and not any project in particular – that’s why the stitch patterns start withe just the stitch. But – You can start with an e-Wrap cast-on.. do a few rows of the Garter Stitch (Knit 1 Row, Purl 1 Row ) so that your edges don’t curl then start the Andalusian stitch. I can’t suggest a cast-off because I don’t know what you’re making. Note that cast-ons (start) and cast-offs (end) depend on the project. To tighten Loose Loops: Click HERE
Hope that helps some,
denise
What is the best cast on and bind off methods?
Jennifer this is a VERY broad question because it really depends on the project. My favorite item to loom is a hat.. Hence the name of the site.. in most cases I prefer to the Chain Cast-on and to Cast off I like to knit 3 rows of the rib stitch and then do the Gathered method
For a flat panal .. I tend to just do an e-Wrap cast-on and then tighten my loose loops.. To bind-off I use a modified version of the Basic Bind-off. You can see me use this on this video for boot cuffs: Click HERE
Hope that helps,
denise
Hi Denise,
I love the simplicity of this pattern, but is it yarn specific? I mean does it come out better with some yarn rather than others…..I am using a basic red heart (Turqua) it it isn’t “popping”. Has anyone else had this problem? I am going to keep going because it is still really cute and I’ll see what happens 🙂
Hi Cynthia, a few things.. the stitch really does come out much better with silky (high sheen)types of yarn. I used the Caron SimplySoft
It also works best on a small gauge loom and you can really see it until you have knitted several rows and the fabric has had time to “rest”
Hope that helps,
denise
can this stitch be done on a Knifty knitter round loom?
I do not have a Martha Stewart loom and I do not want to buy one
Hi Ann, yes you can but you may not be able to see the stitch very much at all.
Thanks for all your work and help.
You are VERY welcome Shirley… and THANKS for the Thanks it’s very much appreciated 🙂
Hi, I am trying to figure out how to do this pattern. Can you please tell me what this means? Multiples of 2 + 1 add the extra stitch for edges. Is the knit stitch supposed to be the beginning stitch and the end stitch of each row? Thank you for your help.
That term applies to a flat panel — It means you do the 2 stitch pattern until you’re reaching the last one and then you do a knit – it’s for symmetry. Otherwise the square will look cock-eyed. The extra stitch on the end is for you to turn and skip the stitch. Gives you a nicer edge then if you knit going in one direction – turn around and knit that same stitch again..
Hope that makes sense.. Let me know if you still feel confused or the explanation didn’t answer the question. If you’re knitting in the round don’t worry about it.
Hugs 🙂
Hi Denise, Thank you for answering me so quickly. I am trying to make a dish cloth with this stitch. I have the KB adjustable hat loom that I am using for this project. I am still learning how to loom knit. I see that in another post you say that we should cast on 36 stitches for a dish cloth. That seems pretty wide when I count out that many pegs on my loom. If I am understanding you I skip the first peg as I just finished that row and start on the second peg on the new row. I also saw that you said that we should use the pearl stitch at the end so it will not curl. So, when I do the knit 1 purl 1 stitch does the first peg on that row count as the knit stitch and I purl the second peg. I hope I am making sense to you. Thank you for your help. Your stitches are so pretty I really want to use them on my looms.
Hey Linda, you have several questions here so let me tackle one at a time.
The peg count is between 34-36 because the stitch is a type of rib stitch and is a bit elastic. The longer your fabric the more you will notice that you compresses. Like a hat brim.
I suggest the purl be incorporated in to the knitting of the borders of a square panel to keep the fabric from curling but not as the last peg. The purl stitch does not make a nice edge. You should do a half stitch after a purl on the edges when you’re getting ready to turn.
The knit 1, purl 1 (Rib Stitch) is the 4th row of every stitch combination – so 3 rows of knit and a row of rib stitch.
I skip a peg when I’m turning in some causes in order to have a nice edge.
I know this is a lot of information – hope it all made sense.
Hi Denise,
Thank you for answering all of my questions. I looked at the video again today. Between what you wrote and looking at the video again I figured it out. I have now done 12 rows today. I decided to do 36 pegs. I can’t wait until I get some more rows done so it will be easier for me to see exactly how it will look. You do such beautiful work and you have been so patient with all of my questions. I really appreciate the help that you have given to me. Take care of yourself. Linda
No problem – glad I could help
When you make a wash cloth or dish cloth how many pegs do you use? I like the Andalusian stitch. Suggestions for some stitches for dish or wash cloths, certain kind of yarn? Thanks so much
Barb, THANKS for the question !!! .. forgot to add that to the post… cast-on 34 pegs and use cotton yarn. Remember to add a border with purl stitches because this rolls.
Many Many Hugs my Loomy
denise
Love this! Thanks for sharing.
Thanks for Thanks Mary !
Hugs,
denise
Can this stitch be used to make baby blankets, hats, scarfs or as a border then go to e wrap for a baby blanket. or any other project…? Love it because it takes the boredom out of doing the same old stitches that I have been using
Hey Priscilla, THANK YOU for the question. You keep me on my toes Loomy! Yes, You can just section out a portion of your project for this stitch. CAUTIOn: The e-Wrap is a looser, larger, wider stitch and will bulge out the section where you use it. Hope to do a video at SOME point on how to do this technique. Will try to create a stitch sampler.