How to Knit a Swatch on a Loom

First let’s define the word swatch. According to google, it’s a small sample of fabric intended to demonstrate a larger piece. In short terms it’s a test run. This means that you knit a swatch to answer a lot of those questions you have about a pending project like what’s the right stitch, the right loom, the right yarn, how many pegs and how many rows will I need.
Let me give you a few more good reasons why you should knit a swatch and how to make one.
Why Knit a Swatch

Some people have the misconception that only pattern designers need to knit swatches. Bit it’s a good idea for everybody especially if those that want to customize a project.
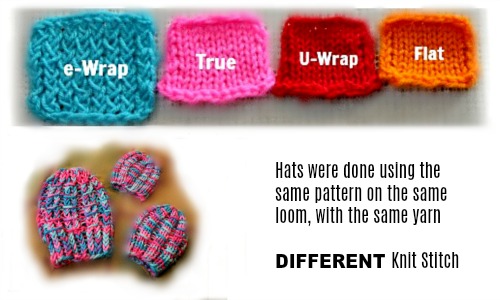
1. Looms: A large gauge loom can make a stitch look very different from one made with a small gauge loom. Look at the picture above both of the pink swatches were made with the same number of stitches and rows. If you like a pattern but don’t have the loom size suggested by the designer a swatch will help you convert the pattern to work with your particular loom.
For further detail on this effect: Click HERE
2. Yarn: The weight and type of yarn you use can have a huge effect on the size and texture of a project. Unfortunately you can’t always rely on the packaging for the actual size of your yarn. There are furry specialty yarns labeled as bulky although the strands are thin.
It’s also a good idea to wash the small sample to see how the fibers react to soap and water.
3. Stitch: Pretty stitches sometimes act ugly. They won’t stretch for your sock cuff or won’t sag for your slouchy. Until you knit up the stitch you won’t know that. Another big problem is the word knit. When the designer doesn’t clarify which version things can get really funky.
4. Does it Curl: The general rule to reducing curls is normally to add purl stitches to your knits. But this is not the case with all stitch patterns.The Rambler Stitch is made up of knit and purl stitches and yet the fabric curls up badly. I would have never thought this would happen with this particular stitch. It wasn’t until I knit a swatch that I realized this was the wrong stitch for my pending project.
5. Cast-on / Cast-off: Understanding all the information above helps you make the decision on how you would like to start and end your project. In order to keep the Rambler Stitch from curling I had to add 2 purl stitches to the edges, 2 rows of purls to my cast-on and 2 rows of purls before my cast-off.
6. Size: Very often folks ask how many pegs or how many rows are needed to make their project larger or smaller. Well if you knit a swatch you will be able to answer this question for yourself. It’s not that I don’t like answering questions but you will find yourself needing this technique over and over again.
7. Reverse Side: Knitting up a sample of a cool stitch will give you a peak at the reversed side. Unfortunately it is not the norm for designers to show you the reverse side of stitch patterns.
8. Overall Look and Feel: Yes, you want to feel your fabric to know if the stitch is too stiff, too scratchy or any other variable.
How to Knit a Swatch
FIRST: CHOOSE
You start by choosing your project or pattern, the yarn and the loom. If you are following a pattern it’s always best to get the exact supplies listed if possible. Keep in mind that any one of these can change after you knit the swatch.
SECOND: KNIT
Read your pattern and look for the sizing information. It may say something like, 4 inches = 12 stitches and 12 rows. Start by knitting at least the amount stated on the pattern. In this case it would be 12 stitches (pegs) and 12 rows of the pattern. You may want to do more if your fabric will need 14 stitches and 14 rows to measure out at 4 inches.
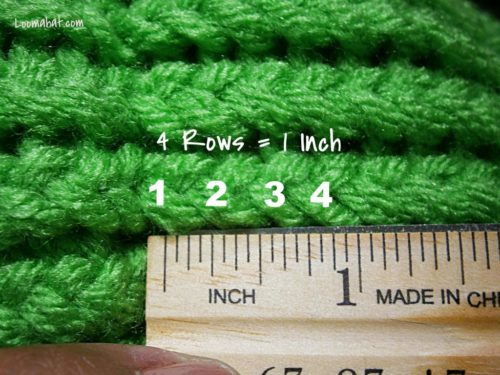
THIRD: MEASURE
Look at the picture above. You can easily see that it takes 4 stitches to make 1 inch. To get the number of rows just put your ruler vertically and do the same kind of measuring. This method does not work with all stitches. Some are just to complex.
FORTH: DO THE MATH
Say I want 60 inches in length and the gauge is 4 rows per inch. I multiple 60 x 4. I will need 240 rows for my 60 inches. Same concept for width. If I want 8 inches of width and the gauge says 4 stitches per inch then I must multiply 8 x 4.
TIP: If you can help it, don’t cast-off your swatch because you might need that little bit of yarn to finish your project.
To Watch on YouTube : Click HERE
Never miss another video: SUBSCRIBE
.
Tagged: how to make a swatch, knit a swatch, loom knit a swatch, swatches