
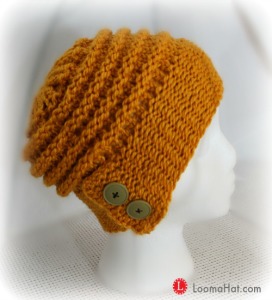
The City Slouch Hat Video Tutorial

Here is a step by step video tutorial of a FREE pattern by loom knitting designer Joanna Brandt. Learn how to make The City Slouch Hat with its chic flap over brim and the easy to do ripples even if you are just a beginner.
This is a classy hat you can wear with your favorite winter gear. I was very glad to be given permission by Joanna to make this YouTube video. Like me, many of you are visual learners and many of you have picked this pattern from the list of 85 FREE hat patterns on this website. There have been a lot of comments asking for the video and both Joanna and I have heard you and here is our response to your request.
My Pattern Notes:
Skill Level: This is an Easy to Intermediate level pattern. I don’t recommend it for the True Beginner. If you have not made a few hats then start: HERE
The most difficult part is the brim, not because of the knitting just for the technique.
Loom: The pattern suggest the 48-peg Knifty Knitter Adult Hat Loom. But any extra-large loom will work just as well.
Yarn: Best options are the Chunky #5 or Super Chunky #6 . If you don’t have thick yarn then Knit with Two Strands as One
Stitches : You will need the Knit and Purl stitches – but I do teach them on the video.
.
My Pattern Changes: There is no mention of the number of rows for the 3 inch brim. I repeated the Garter Stitch with the u-Wrap Knit Stitch pattern 11 times. For a child’s brim of 2 1/2 inches I repeated the pattern 7 times.
I followed the rest of the pattern exactly and my hat was not as slouchy – maybe because of my yarn weight of Paton Shetland Chunky #5 in Gold instead of Super Chunky #6
Video is Below – For the Free Pattern: Click HERE
Video Note:
As always I recommend watching the video completely before starting the project. This helps you have an understanding of the techniques and makes you more secure about tackling the project.
Most importantly just have FUN !
Send your pictures so that I can include them here ! Let’s see this baby in lots of different colors !


Tagged: drawstring cast-on, flap-over, flap-over brim, free loom knit patterns, hat, hat patterns, slouchy


Thanks so much for sharing. You made it easy to follow from beginning to end.
You had me right up to the end. Weave the ends into the knitting. The tails from gathering the crown can be threaded into those stitches to make them disappear. And the final end after sewing to flap together can be woven in somehow to make it look as good on the inside as the outside. Amps the finished product into a higher quality category. Otherwise a beautiful hat! I was looking for a hat to use up some single skeins of bulky yarn. This is it!
Thank you Denise for your reply on the Slouchy Flap-Over Brim Hat. I did make the Ombre Hat. It so pretty. I have been trying to find you on Facebook, but know luck.
How about a link – Click HERE
I love this hat…..just couldn’t make the Flap, so I made it without the Flap and I still love it. Would love to show you how it turned out. Also, I used your cast off and it worked just the same. Thank you so much.
Hi Ollie, I would suggest trying it again later. It is easier then it looks after you get the hang of it – here is a design similar to this one with an easier brim: Click HERE
Fantastic video thanks
Thank you for the Thank you Betty. Very much appreciated !
I don’t know what I did wrong but I completely ruined my hat at the end with that flat drawstring loop pulling…. No idea how to fix it so frustrating
Liz, this technique can be problematic – just pull it close as much as you can – then just use a needle to sew the opening
I just wanted to say thank you! I got a loom set for Christmas and after a few basic e wrap hats, I wanted to try something a bit more stylish. I would had never made sense of the flap on the pattern. Thank you for the tutorial. My hat turned out perfect. It isn’t as slouchy as the pattern, mine came out a bit more fitted like yours, but I prefer that anyway! Thanks!
So glad it worked for you – I REALLY appreciate you taking the time to give me this feed back 🙂
Great video! Thanks for the thorough, step-by-step instructions! I’m not a knitter and this is the first knitting tutorial I have ever watched. Your tutorial is so good I’m confident that I can do this! I can’t wait to get started!
Glad you like it – be sure to watch the video COMPLETELY before starting the project ! Let me know if you have any questions. 🙂
Hi Denise,
I made this for my daughter on the yellow 41 peg loom with the modified directions using the extra purl. She wanted a smaller brim (she’s a small person, but not a child) so I shortened it to about 2 inches and she didn’t want it to slouch as much. I adjusted this by decreasing the knit 3 purl 2 rows to 4 times rather than 5 times. I am so grateful for your video! I followed it, pausing until I was ready to move to the next step. I’d love to send you the picture to post as I don’t have a website.
Thank you Kelly that would be awesome – you can post in on the Facebook Fan Page : Click HERE or send it by email to denise@loomahat.com
I can not find your link to block stich can you post it or email it to me
Hey Lisa.. there is no Block stitch – sorry – I need to look back at what a posted. I meant to say that you need to block your hat for the stitches to show up well and to get rid of the line that shows up when you increase your rows.
Just do a YouTube search of How to block your knitted hat.
Hope that explains it.. if not let me know
denise
Just finish my hat ‘im going to make more for next xmas love all the stitches
thanks for all your time you put into this to show us how to make it
I’M Making this hat Very easy love love it you make it easy to catch on
thanks lisa
Thanks for the Thanks Lisa !… Hugs
I just finished this hat, and I LOVE the way it turned out. To make it, I used 2 strands of Lion Brand Unique yarn, in Jewel color. Got a set of Darice looms for Christmas, and this is only the third hat I’ve done. The video directions were great! (It IS helpful to watch the entire video first.) I just kept my laptop next to me as I worked, and paused after each step. My only mistake was when I was doing the knit 3, purl 2 part of the hat. On the 2nd set, I accidentally knit 4 instead of 3, but it isn’t really noticeable. Also, the loom is a 41 peg, so I took Denise’s advice when doing the knit 2, purl 2 top and just did an extra purl on the last peg. You can’t really tell that there is an extra purl there. I just posted a few pics on my Pinterest page. It was a really fun project. Thanks, Denise and Joanna!
Thank YOU Mary. I love, love , love it ! ! ! !
Big Hugs Loomy,
denise
You are most welcome! If anyone wants to see pictures of my finished product, go to: https://www.pinterest.com/mferg56/hat-projects/
I made this hat once and messed up the brim,but the top of the hat looked beautiful..I know now what I Did wrong after reading theses comments,I too didn’t take off the top 6 loops onto the crochet hook each time.I am on my way to give it another go .I LOVE THE LOOKS OF THIS HAT SO MUCH.Thank you for your great videos.I am not a knitter and am new at looming but it is so much fun and makes me happy to have a new way to fill my hours,
Thank YOU Maxine for ALL your kind words – Love them Love them,
Many Hugs for You My Loomy
denise
Hello Everyone,
Well I did a practice Slouchy City Hat. Good thing too. I missed up in a few areas. So bad that I am not going to show a picture or put the buttons on the. But that is ok. I am going to try again with thicker yarn and hopefully post a picture.
Happy Looming 🙂
Dawn
Practice makes perfect !
When using a 41 peg loom, what would be the best way to do the knit 2 purl 2 rows since it’s an odd number of pegs? I just finished the brim and it’s looking great so far. Thanks for the great video and pattern!
Stupid phone. My name is Thomas not Thomad Lol!
Hi Thomas – depends on what you prefer I would tell you to add an extra purl because its more of a flat stitch. But either one works fine.
Hope that helps,
denise
I just wasted 6 hours of my life attempting to make this awesome hat. I don’t know where I went wrong- possibly at the taking off off the 6 pegs and putting them back on. I wasn’t aware this had to be done each time. I thought that this was a great tutorial, but I was wrong. I am sad that this didn’t turn out- I hope I can unravel it to save the yarn.
Wow Anne, let me share this much with you to see if I can make you feel better about your 6 Hours, the designer spent DAYS not just creating the design but testing the pattern – the one she offered to you for FREE. Then I spent a week testing the pattern ( 3 hats in 2 sizes ) and then filming and editing a video you can watch for FREE.
I don’t have a crew and Joann is a busy mom so we gave you our best. I KNOW this is a great pattern and a pretty good video if I say so myself. … To bad for you – you miss out on a really cool hat.
Thanks Denice. Sorry Diane it didn’t work your first time. I couldn’t even begin to count the hours I’ve tried various things and failed the first time. Practice makes perfect and I always learn something new when I’m trying something so never figure it as a waste of time. Yes this did take quite a bit of time figuring out and writing up. I recommend reading the written pattern through and also watching the video in its entirety prior to starting the hat so you have clear understanding of what needs to be done. Also reading and looking at the written pattern while following the video is a great way to begin to understand how to read patterns. Once you are able to read patterns the loom knitting world really opens up with possibilities! 🙂
Hello Everyone,
In my 5th time in trying to get started just on the rim I may have had the light bulb come on. I watched the video many times and read the pattern many times. When you take the 6 loops off you don’t do it just once but for each time you go around. What I thought you did was just work with those six pegs. No wonder when I looked back to do the next step I could not understand how mine was so short and Denise’s was long all the way around. Ugg. Hope I got it now.
Thanks for pointing that out – who know how many people have thought the same thing and never said anything.. going to try to see how to word this on my video captions..
Mach Hugs to You Ms. D,
denise
Don’t feel bad Dawn I did the same thing 🙂 I am glad you kept at it though I am not sure I would have had the patience to keep it that many times 😀
Last question. Instead of removing all 6 stitches for the crochet hook at once, can you remove one at a time, purl it, and put the stitch back on?. This is going to be the trickiest part of the Hat for me, I’m afraid. Thanks.
Well you’re not removing the stitches in order to purl – you’re removing them in order to knit the bottom ones. If I understand your question correctly – I would have to say, no. But I have some difficulty picturing words.
Hope that helps some,
denise
Thanks Denise. I meant “knit” not “purl.” I guess I was asking if you could take one stitch off and put it on a stitch holder, knit the bottom one, and put that removed stitch back on (one at a time), instead of all six. But I think I understand why you would have to remove all six at once. Thank you for your time and patience. You rock!!!
I myself take top stitches off one at a time and just hold the stitch in my fingers while working the one below and then place back on. It’s important to make sure your working yarn is going in the correct direction though when you do it this way. I find this to be the fastest method and I’ve done a TON of these hats. 🙂 Hope that helps! 🙂
Hi Sara 🙂 I don’t know if Denise will say the one loop at a time will work but I will say that I just finished the hat (intermediate beginner) and I thought that the removing and replacing the loops was going to be super hard but it turned out to be just a bit tricky….I found it easier to lay it down on a table and do that step rather than rest it in my lap, I know this is a pain but it made it simpler 🙂
Enjoy making your hat!!
Thanks for the response. Still a bit chicken to start because I don’t have the 48-peg loom. I know I can use another, but I’m still a beginner.
Hey Sara,
I tested this pattern on a 41 peg Ex Large loom with Red Heart Economy yarn – I bought it with a coupon – knit with 2 strands as one. It turned out fine.. but I recommend a nice wool blend for the real one. … send pictures 🙂
denise
I watched the video all the way through, and am excited to try it. Question: you answered it up above, but I would ask for more clarification. When you put the 6 stitches on the crochet hook (or stitch holder, maybe), and you put them back on, you have to take them off and put them back on for all those sets of rows (repeating rows 1&2 for three inches)?You’re great at these videos, by the way.
Hi Sara, yes you are taking the top 6 (loops) stitches off the pegs in order to knit the stitches the bottom of those 6 stitches. You are doing that until you finish the flap-over brim. After that you will be knitting in the round and you will not have an extra set of loops.
Hope that helps,
denise
Hello everyone! Glad you’re enjoying the pattern and thanks Denise for making the video. I did want to make a note on the hat length. The pattern as written should produce a hat that is about 10″ long. For me this is pretty slouchy, but I’m rather petite (normally I make brained for myself about 7 1/2″). For other people I’ve added one, two, or three extra sets of the knit 3 rows purl 2 rows. The hat also was designed to wear more back on the forehead so if you don’t desire to wear it this way or need it longer just do extra of the main body portion. Hope this is helpful! 🙂
Denise,
Okay tried the hat and failed horribly 🙂 I went through the video again and I think I found my boo boo but I need to ask a couple of questions so my brain will work right 🙂
For the brim, I U Wrap and then reverse (half stitch) on peg 1 and then for the Purl I reverse (half stitch) on peg 6?
Second, most important (and probably very silly) do I need to remove the 6 loops and knit every time?
Thanks 😀
Hi Cynthia,
The half stitch is on done on the ends – the last stitch before you turn. You remove the top (flap-over brim) stitches every time until finish the flap-over.
Hope that helps,
denise
Thanks Denise for getting back to me so soon! I definitely see where my boo boo was now…okay off to create a hat 🙂 I will post pics when I am done 🙂
C
Love the City Slouchy Hat. I watched the video hope I can do it. I can’t wait to try
Dawn, send pics ! 🙂
I will when I get it done. Can’t wait.
Hello Looma Hat. Q: I do not have a 48 peg loom. I watched your video and I am making this on a 40/41 Peg round loom. Is the flap over on the brim still over to 6th peg or does it change for smaller loom? I have to say… I have just started loom knitting and made 3 hats w/basic e wrap. Then I made 2 adult womens hats as Christmas gifts using different rows of stitches. They turned out wonderful! It is so much fun to learn new techniques. Your video’s are awesome and I love the way your so descriptive. Very informative! Absolutely love this slouch style hat! Thank you & Blessings. Heather F
Thank You Hearther !
Yes, Same technique – the brown hat at the end of the video was done with a 41-peg KK loom
Hope that helps,
denise
Thanks! This may be my next hat project! I think it looks great!
I love the Belt Loop Hat. I have made3 so far for our girls. They love them also. Thank you so much for the free patterns. Your the best
Thank you so much!!! I love the pattern and the video helped explain it beautifully! In fact, you explained the cast-off so well, and I use the bind off all the time too, but you gave some details that are so helpful. I am dancing a jig! Thank you for this Christmas gift! I am grateful for all you do! …(:
My Grand daughter and I really like this hat. I’m relearning to knit after about 35 years so hope I can make it. Thanks for sharing