
Yarn to Front Technique for Lacy Fabric

Many of us know the Yarn in Front but have you heard of the Yarn to Front, No? Well it’s a new technique by Joanna Brandt. Together with the SSK1 and the basic e-Wrap it creates a really nice lacy fabric. Great for summer and spring designs. Best of all there is a video tutorial if you’re like me, a visual learner.
Below are the basic steps with text and pictures. Under that you will find Joanna’s quick 5 minute video which includes the SSK1 and the e-Wrap instructions. Enjoy it and tell me what you think.
The Basic Steps for Yarn to Front
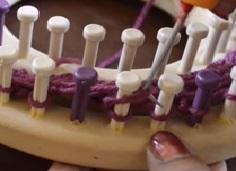
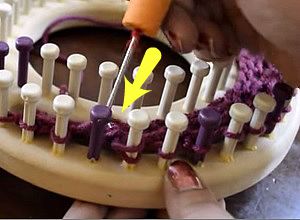
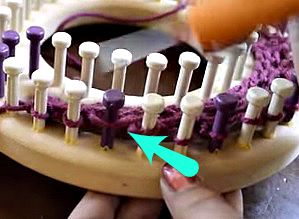
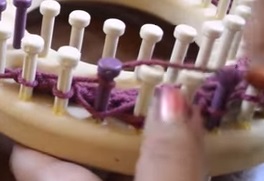
I know that t’s little bit hard to see in the picture and on the video because Joanna used purple yarn on a purple peg. But if you can’t see perfectly, just read the text below for the step by step directions. If you have questions she is VERY good about answering you. Put your questions below in the comment section or visit her on Ralvery. Browse around her store that has lots of cool patterns and please thank her for allowing me to share this with you.
Lets list each step for the technique: Note this is just the YTF part, watch the video for more information.
Step 1: You need an empty peg. Take the yarn off the peg. Place it over the existing loop on peg to the right.
Step 2: Scoop up the loop from the back of the peg.
Step 3: Place it on the empty peg
Step 4: e-Warp that peg
The Video: Yarn to Front
Its always best to watch the video completely before starting the project. Note: This is NOT my technique – the person in the video is NOT me. Should you want to contact Joanna Brandt directly she has a Ravelry profile which has a contact me button or check her out on YouTube .
.
Remember that if you have questions or comments you can post them on this page or contact the designer Joanna Brandt directly. Links are above the video
.
====================================================================
>
.
.


Joanna, how did you start out the first two rows on the loom? Did you do an e-wrap first and then start the Yarn to Front stitch? Also, once you do the Yarn to Front stitch, is the next row an e-wrap or a Yarn to Stitch row again?
Good Morning Denise here from South African.
One concept I just cant get the answer of. Patterns say Loom Clockwise or anti clockwise.
How do I know where is clock or anti clock I have to start. I watched another video and she said anti-clockwise, but started looming to the left which should then be clockwise?
Thank you for a stunning blog.
Joyce
Hi Joyce,
That I know of the clock runs in the same direction regardless of the country. The person in the video may have gotten confused. When you’re recording this can get a bit confusing because your adrenaline goes up – you’re concerned about a lot of things, the pattern, the lighting, background noise. Also – some pattern work the same regardless of the direction you knit. I would suggest you research if the person on the video had a written pattern. Sometimes you get missing information that way.
Hope that helps some.
denise
The direction you cast on for this stitch technique doesn’t matter as long as you’re moving the appropriate yarn to front prior to ewrapping. Please view my video on the k2to ytf as well as my netted mesh stitch video in which I use this technique as well. Links below. 🙂
https://www.youtube.com/watch?v=ZuCNIt8A1mA
https://www.youtube.com/watch?v=fI_Wx3rLo6U
For me I get confused on which direction I’m working as I have to work completely differently than how I actually loom knit. I work with the working pegs furthest away from me and inside out if that makes any sense. You can kind of see how I work in this video here: https://www.youtube.com/watch?v=y8-1bl1uncU
Hope this helps!
~Joanna