
 How to Loom Knit a Hat – Start
To know to loom knit a hat first you should know basic loom knitting. This page helps you with a Looming Knitting 101 video. You learn the basic skill so that you can move to the next step which is making your brim
For a picture and text tutorial scroll down this page. Please follow the pictures from left to right, the written instructions can be found under each college. If you get stuck on one part of the project… feel free to return to that spot as many times as is necessary, you can leave your questions below or in the forum.
.
.
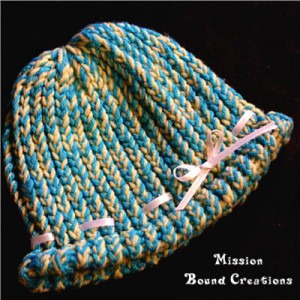
Supplies Needed: Circular Loom , Yarn , Yarn Needle, Hook, Scissors
—————————————————————————————————
The Optional Knot
Note: I don’t use a knot when I loom knit. So when you watch one of my videos you will notice that I just loop the yarn loosely around the anchor peg and then release it once I have gone around the loom a couple of times. That is my personal preference. But if you are a beginner then I recommend that you use the knot until you figure out what works best for you.

1. Start with two strands of yarn. This is best way to avoid holes and loose loops.
2. Wrap the yarn around your finger.
3. Cross the yarns over
4. Pull the loop off your finger
5. Bring the left yarn up behind the loop. Push the yarn through the hole
6. Pull the loop up to tighten the knot
7. Put the knot on the anchor peg. – Tighten the knot.
Now It’s Time to Loom
The stitch that you will learn here is called the e-Wrap. There are many different stitches used to loom knit. However, to keep the site as easy as possible all the projects here are made using this one stitch or versions of it.

1. Find the anchor peg. It is where you placed you knot.
2. Start by taking your string behind the peg directly behind the anchor peg
3. Bring it towards the right then towards the front and wrap your peg
4. Bring the yarn behind the peg to right .
5. Repeat steps 2-4.
6. Go completely around the loom. Return to the first peg.
7. Start again wrapping the pegs counter-clockwise. Pushing the top row down a bit as you place the strands over the bottom.
8. Get your hook. You will find each peg has a dent. Rest your hook in the dent with the spike upwards. Pull the bottom two strings over the top two strings,
9. Then pull the two top strings and over the peg. Pull the hook out and the do the same for each peg until you have gone around the loom completely. When you return to the anchor peg you have completed one row.
Each row that you complete makes the knitting longer.
You now have a new decision. Do you make a brim or not? Like the knot, the brim is optional There are times when I will choose not to include one in my project. This is mostly for newborn hats.
But if you choose to go with a brim then…
Your Next Steps are : The Brim and Closing the Hat


My hat feels very hard. Could it be the yarn?
Yes – try steam blocking it: Click HERE
Denise, I’m leading a class on how to create hats with a loom for the homeless. I found your instructions and would like to know if I may use them for my class. I would copy the instructions, with your url, showing the step by step instructions.
Thank you for considering my request.
Sandi
Hi Sandy – PLEASE do !
I like Denise on the videos. She is clear, easy to follow. Her tips come in handy. I am 72 years old, tried crocheting but could not follow written instructions well. Since I have watched your round loom videos, I can also follow the written instructions for the round loom. I plan to get a book of patterns for the round loom eventually.
Thank you
Thank YOU Barbara !
Could you make a video on how to make wash clothes!!!?
Hi Maggie for a wash cloth vid Click HERE
Hi Denise, can I use chunkier yarn? I think the yarn I have is 6.
Yes 6 works fine with a large gauge loom.
Hi Denise
I just finished my first hat on a loom using your beginners video. It came out great. I used two strands of weight 4 yarn on a 36 peg round loom. Made a 3 inch brim and 6 inch top. The only problem that I had was after the hat was complete, you put it on and the top part stretched so you could see the person’s head through the stitches. The brim was perfect because it was doubled. My question would be is there a way to prevent the see through problem? Is it possible to double the whole hat and triple or cuff the brim? Or use a different stitch? Also was going to try using one strand of a chunky yarn on the next hat.
Thank you for the help
Hi Ben, most likely the problem is the size of your loom and your version stitch. Are you using it for an adult and which hat did you make?
I have made a garter stitch scarf. Now I want make a garter stitch hat to match my scarf. I need your help to make it. Please help me. Thank you.
Maggie, I will be making a brimless garter stitch hat soon. Subscribe to the website or the Youtube channel
Why do I have holes in my knitting?
Hey Donna – it can be several reasons including the yarn, the stitch or your tension. Until you get more experience might be a good idea to do something a bit different take a look at this post: Click HERE
What kind of cast-on can I do? I typically just e-wrap all around twice and then after I’m finished with the brim, fold it in half and yarn over for a classic brim. This time I’m using a thicker yarn with a garter stitch so I don’t want to fold over the brim, I would just like to have it stand on its own. I don’t know how to cast-on without having loose loops on the bottom of the hat. Hopefully that makes sense. Thanks, I love your website and youtube channel!
Here is some information that may help: Click HERE
I have made over 100 hats for charity projects. I asks friends for yarn so most of what I get is the regular yarn. I like the variegated yarn. I let the yarn make the different patterns. I have learned that the bottom color will show on the hat. So I wrap my variegated yarn around each peg then I wrap the second solid color. This will keep the variegated color showing. I get a lot of white so I will often use white. The inside of the hat is white with the outside the pretty variegated color.
I also have used two solid colors and put one color on bottom for five or so rows and then put the other color on bottom for the next five rows. I then have stripes around the hat.
Why does my at have holes am I suppose to do tighten the yarn or leave it loose?
Brenda, if you’re talking about the first row – that row is always loose. There are many techniques to tighten and to avoid them but I would tell you to first learn the basic and then dive in to more advance techniques. Plus if you do a folded brim – you can’t see the loose loops
Hello, loving all your vids and so glad I found you, one problem! I have tried several of you hat patterns but they always seem to come out quite small? Any ideas??
Jane – soooooooorry for the delay – just add a few rows the hat portion of the pattern ( not the brim or the crown)
Hi denise, I have a little problem. Can you help me. Sometimes my hats they roll up. I thought that if you do a purl it does not do that but still it rolls up, help
Sometimes is those first stitches – If they’re very loose it may still roll a bit. You can tighten them up easily: Click HERE
I tried to make a hat on a loom and I came out with all these holes in it
There are several reasons why this can happen: Here is a good post to read: Click HERE . Here is a good video for beginners: Click HERE
Hi! Thank you for your awesome videos! I’ve watched the beginner video with the yellow and orange hat several times. How do you manage to get your hat so perfect? I’m using two strands over two strands but I still have holes. My loom is from Michaels. Thanks in advance.
Nikki, I was having the same problem and couldn’t find the answer anywhere! I think I figured it out though. I think I had not been starting with the same peg every time I started wrapping or knitting, and that way I was accidentally dropping stitches and making holes in the hat. When you begin wrapping (EACH TIME you go around wrapping), make sure you are starting on the peg slightly to the right of the anchor peg (I have the Michaels looms too, and the pegs don’t line up directly behind the anchor pegs). Then, when you end the wrapped row on the peg right before that, start knitting starting on that peg (the one slightly to the left of the anchor peg). Then when you are finished knitting that row, make sure you start wrapping again on the peg slightly to the right. I hope that makes sense! Good luck!
It is when using the basic round loom.
My daughters and I have just recently started to loom and find all the videos extremely helpful. One problem we seem to continuously have is when you get to the last peg when wrapping behind each peg we end up with a huge loop of yarn? How does this happen? Are you not wrapping our initial e-wraps tight enough?
Chanda – are you talking about when you’re knitting panel or in the round?
Chanda, I think your problem might be that you forget to take the yarn off of the start peg when you finish a row. When you get back to the side peg you must pull the thread off before you start a new row. Then when you wrap the thread for the second row it should not leave a hole. Hope this is your problem as it is a simple fix.
I used to loom and crochet, I’m unable to crochet anymore due to arthritis I am going to loom again but really need to get back to basics! I was wondering though, could I used these loom projects on my homemade looms? My husband has made me some with a 1/2 inch gauge?
Melissa handmade looms are wonderful and they should work fine. Hopfully the “size” of the looms is not to different from the commercial bands. I have grown to really like some of the homemade looms like Cindilooms. There are lots of folks now making looms and selling them on eBay. Some work VERY well and some don’t. The gauge it usually not an issue – It’s all about the peg. What ever is used to create a peg can sometimes make it almost impossible to knit. It’s the reason I don’t use the Boye looms. I did a project review with a video of these looms: Click Here
Also I have found that the KB Hook works best because the tip is usually thinner. But any hook will work.
Hope that helps,
denise
So by two strings, how do I do that? I want to use one pattern but I just don’t understand how to make two strings without estimating how much yarn I will need from the pattern.
“My partner and I stumbled over here different page and thought I should check things out. I like what I see so i am just following you. Look forward to looking over your web page yet again.”